RGW对象存储网关 (八)
Ceph中独立的服务如果不用可以不启用。 类似阿里云OSS对象存储。遵循亚马逊S3标准数据存在bucket中
官方文档:http:/docs.ceph.org.cn/radosgw/
数据不需要放置在目录层次结构中,而是存在于平面地址空间内的同一级别,
应用通过唯一地址来识别每个单独数据对象。访问的时候传递的URL是固定的。
每个对象可包含有助于检索的元数据通过RESTful API在应用级别(而非用户级别)进行访问

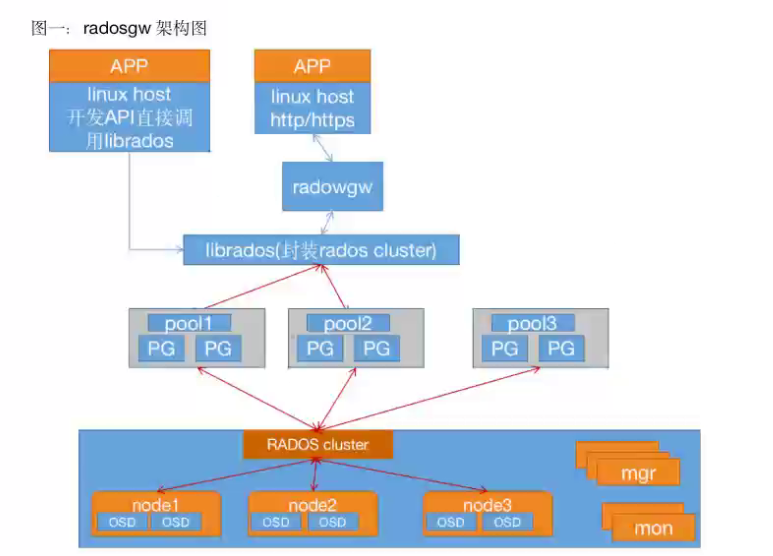
8.1 RadosGW对象存储简介
RadosGW是对象存储(OSS,Object Storage Service)的一种实现方式,** RADOS网关也称为Ceph对象网关、RadosGW、RGW,是-种服务, 使客户端能够利用标准对象存储API来访问Ceph集群,它支持AWSS3和SwiftAPI**,在ceph0.8版本之后使用Civetweb(https://github.com/civetweb/civetweb))的web服务器来响应api请求,客户端使用http/https协议通过RESTful API与RGW通信默认端口7480,而RGW则通过librados与ceph集群通信,RGW客户端通过s3或者swift api使用RGW用户进行身份验证,然后RGW网关代表用户利用cephx与ceph存储进行身份验证.
S3由Amazon于2006年推出,全称为Simple Storage Service,S3定义了对象存储,是对象存储事实上的标准,从某种意义上说,S3 就是对象存储,对象存储就是S3,它是对象存储市场的霸主,后续的对象存储都是对S3的模仿。
8.2 对象存储特点
通过对象存储将数据存储为对象,每个对象除了包含数据,还包含数据自身的元数据。
-
对象通过Object ID来检索,无法通过普通文件系统的方式通过文件路径及文件名称操作来直接访问对象,只能通过API来访问,或者第三方客户端(实际上也是对API的封装)。
-
对象存储中的对象不整理到目录树中,而是存储在扁平的命名空间中,Amazon S3将这个扁平命名空间称为bucket,而swift则将其称为容器。无论是bucket还是容器,都不能嵌套。
-
bucket需要被授权才能访问到,一个帐户可以对多个bucket授权,而权限可以不同。方便横向扩展、快速检索数据。
-
不支持客户端挂载,且需要客户端在访问的时候指定文件名称。不是很适用于文件过于频繁修改及删除的场景。
-
ceph使用bucket作为存储桶(存储空间),实现对象数据的存储和多用户隔离,数据存储在bucket中,用户的权限也是针对bucket进行授权,可以设置用户对不同的bucket拥有不同的权限,以实现权限管理。
基于bucket对项目隔离
对象存储运维需要做的事情:
启用RGW
做好RGW的高可用
创建bucket
创建用户并授权
做好监控
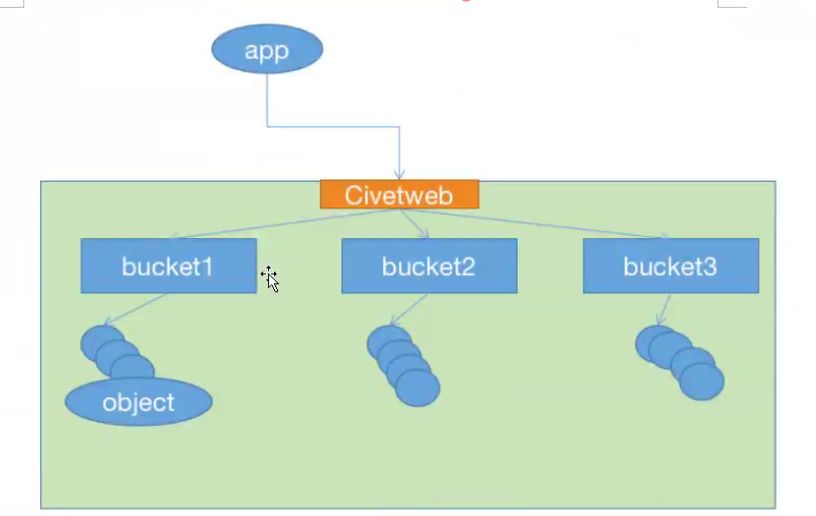
8.2.1 bucket 特性
存储空间是用于存储对象(Object) 的容器,所有的对象都必须隶属于某个存储空间,可以设置和修改存储空间属性用来控制地域、访问权限、生命周期等,这些属性设置直接作用于该存储��空间内所有对象,因此可以通过灵活创建不同的存储空间来完成不同的管理功能。
同一个存储空间的内部是扁平的,没有文件系统的目录等概念,所有的对象都直接隶属于其对应的存储空间。
每个用户可以拥有多个存储空间
存储空间的名称在OSS范围内必须是全局唯一的,一旦创建之后无法修改名称。
存储空间内部的对象数目没有限制。
8.2.2 bucket命名规范
https://docs.amazonaws.cn/AmazonS3/latest/userguide/bucketnamingrules.html
- 只能包括小写字母、数字和短横线(-)
- 必须以小写字母或者数字开头和结尾.
- 长度必须在3-63字节之间。
- 存储桶名称不能使用用IP地址格式.
- Bucket名称必须全局唯一
8.3 对象存储访问对比
目前主流有三种访问标准:
AmEizon S3:提供了user、bucket 和object分别表示用户、存储桶和对象,其中bucket
隶属于user,可以针对user设置不同bucket的名称空间的访问权限,而且不同用户允许访问相同的bucket。
(使用最多-最广泛)
OpenStack Swift:提供了user、 container 和object分别对应于用户、存储桶和对象,不过它还额外为user提供了父级组件account, account用于表示一个项目或租户(OpenStack用户),因此一个account中可包含一到多个user,它们可共享使用同一组 container, 并为container提供名称空间。
RadosGW: 提供了user、 subuser、bucket 和object,其中的user对应于S3的user,而subuser则对应于Swift的user,不过user和subuser都不支持为bucket提供名称空间,
因此,不同用户的存储桶也不允许同名;不过,自Jewel版本起,RadosGW引入了tenant(租户)用于为user和bucket提供名称空间,但它是个可选组件,RadosGW 基于ACL为不同的用户设置不同的权限控制,如:
Read读权限
Write写权限
Readwrite读写权限
full-control全部控制权限
8.4 部署RadosGW服务
将ceph-mgr1、ceph-mgr2 服务器部署为高可用的radosGW服务
8.4.1 安装radosgw服务并初始化
Ubuntu
#apt install radosgw
CentOS
[root@ceph-mgr1 ~]# yum install ceph-radosgw
[root@ceph-mgr2 ~]# yum install ceph-radosgw

#在ceph deploy服务器将ceph-mgr1初始化为radosGW服务:
[ceph@ceph-deploy ~]$ cd ceph-cluster/
[ceph@ceph-deploy ceph-cluster]$ ceph-deploy rgw create ceph-mgr2
[ceph@ceph-deploy ceph-cluster]$ ceph-deploy rgw create ceph-mgr1
8.4.2 验证radosgw服务状��态
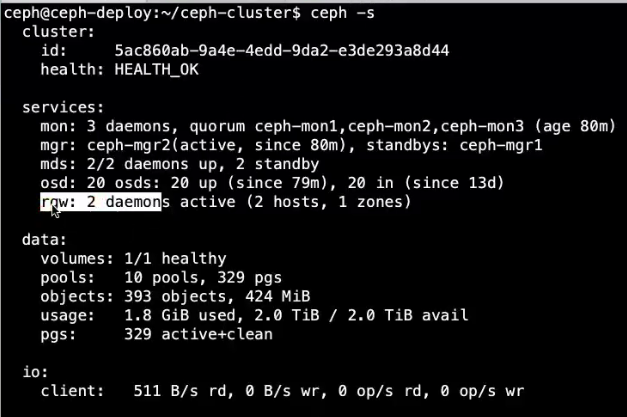
8.4.3 验证radosgw服务进程
ps -ef | grep radosgw
8.4.4 radosgw的存储池类型
启动radosgw 服务自动创建default zone区域存储池,这些存储池的功能是不一样的
root@ceph-deploy:~# ceph osd pool ls
device_health_metrics
cephfs-metadata
cephfs-data
.rgw.root
default.rgw.log
default.rgw.control
default.rgw.meta
default.rgw.buckets.index
default.rgw.buckets.data

root@ceph-deploy:~# ceph osd pool get default.rgw.buckets.data crush_rule
crush_rule: replicated_rule #默认是副本池

root@ceph-deploy:~# ceph osd pool get default.rgw.buckets.data size
size: 3 #默认的副本数

root@ceph-deploy:~# ceph osd pool get default.rgw.buckets.data pgp_num
pgp_num: 32 #默认的pgp数量
root@ceph-deploy:~# ceph osd pool get default.rgw.buckets.data pg_num
pg_num: 32 #默认的pg数量
8.4.5 RGW存储池功能
root@ceph-deploy:~ # ceph osd lspools
1 device_health_metrics
3 cephfs-metadata
4 cephfs-data
9.rgw.root
10 default.rgw.log
11 default.rgw.control
12 default.rgw.meta
13 default.rgw.buckets.index
14 default.rgw.buckets.data
15 default.rgw.buckets.non-ec
.rgw.root: 包含 realm(领域信息),比如zone和zonegroup。(用于不同区域多机房之间)
default.rgw.log: 存储日志信息,用于记录各种log信息。default.rgw.control: 系统控制池,在有数据更新时,通知其它RGW更新缓存。default.rgw.meta: 元数据存储池,通过不同的名称空间分别存储不同的rados对象,这
些名称空间包括用户UID及其bucket映射信息的名称空间users.uid、用户的密钥名称空间
users.keys、用戶的email名称空间users.email、用户的subuser的名称空间users. swift
、以及bucket的名称空间root等。default.rgw.buckets.index: 存放 bucket到object的索引信息。default.rgw.buckets.data: 存放对象的数据 。default.rgw. buckets.non-ec :数据的额外信息存储池。
8.4.6 验证RGW zone信息
root@ceph-deploy:~# radosgw-admin zone get --rgw-zone=default
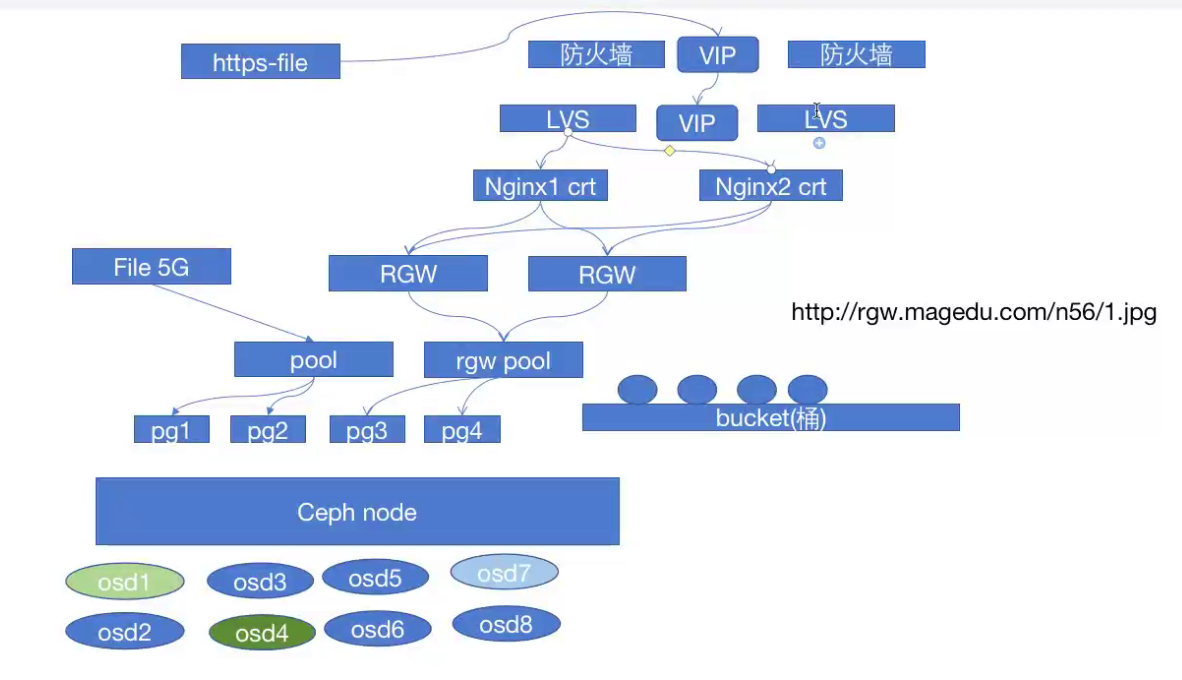
8.5 radosgw服务高可用配置
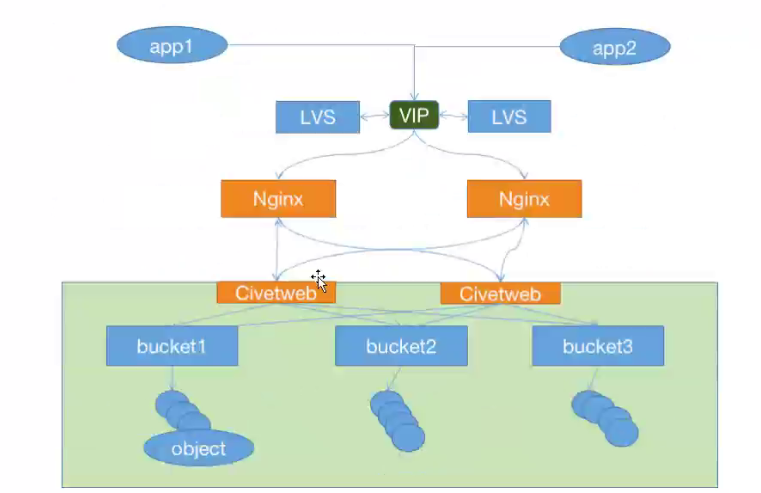
8.5.1 radosgw http高可用
8.5.1.1 自定义http端口
配置文件可以在ceph deploy服务器修改然后统一推送,或者单独修改每个radosgw服务器的配置为统一配置,然后重启RGW服务。
https://docs. ceph.com/en/latest/radosaw/frontends/
[链接](https://docs. ceph.com/en/latest/radosaw/frontends/)
[root@ceph-mgr2 ~]# vim /etc/ceph/ceph.conf
[client.rgw.ceph-mgr2] #在最后面添加针对当前节点的自定义配置如下:
rgw_host=ceph-mgr2
rrgw_frontends=civetweb port=9900
#重启服务
[root@ceph-mgr2 ~]# systemctl restart ceph-radosgw@rgw.ceph-mgr2.service
8.5.1.3 测试http反向代理
使用haproxy代理 rgw两个节点
yum install haproxy

vim /etc/haproxy/haproxy.cfg


listen ceph-rgw
  bind 172.31.6.201:80
  mode tcp
  server rgw1 172.31.6.104:7480 check inter 3s fall 3 rise 5
  server rgw2 172.31.6.105:7480 check inter 3s fall 3 rise 5

systemctl restart haproxy.service
8.5.2 radosgw https
在rgw节点生成签名证书并配置radosgw启用SSL
方式一: 在反向代理配置SSL证书
方式二: 内置自签证书(浏览器提升不安全证书)
8.5.2.1 自签名证书
[root@ceph-mgr2 ~]# cd /etc/ceph/
[root@ceph-mgr2 ceph]# mkdir certs
[root@ceph-mgr2 ceph]# cd certs/
#生成key
root@ceph-mgr2 certs]# openssl genrsa -out civetweb.key 2048

#自签发
[root@ceph-mgr2 certs]# openssl req -new -x509 -key civetweb.key -out civetweb.crt -subj "/CN=rgw.magedu.net"
#将key和私钥放一块
[root@ceph-mgr2 certs]# cat civetweb.key civetweb.crt > civetweb.pem
[root@ceph-mgr2 certs]# tree
8.5.2.2 SSL配置
[root@ceph-mgr2 certs]# vim /etc/ceph/ceph.conf
[client.rgw.ceph-mgr2]
rgw_host = ceph-mgr2
rgw_frontends =  "civetweb port-9900+9443s ssl_certificate=/etc/ceph/certs/civetweb.pem"
root@ceph-mgr2 certs]# systemctl restart ceph-radosgw@rgw.ceph-mgr2.service
8.5.2.3 验证https端口
ss -tnl
8.5.3 radosgw https高可用
通过负载均衡对radosgw进行反向代理,实现高可用
8.5.3.1 域名解析至VIP
先将域名解析至负裁均衡的IP
172.31.6.201 rgw.magedu.net
8.5.3.2 负载均衡配置
负载均衡配置监听及realserver ,把SSL证书放在了rgw节点上面(也放在负载均衡上面)
#ceph http access
listen ceph-rgw
bind 172.31.6.201:80
mode tcp
server 172.31.6.104 172.31.6.104:9900 check inter 3s fall 3 rise 5
server 172.31.6.105 172.31.6.105:9900 check inter 3s fall 3 rise 5


#ceph https access
listen ceph-rgw
bind 172.31.6.201:443
mode tcp
server 172.31.6.104 172.31 .6.104:9443 check inter 3s fall 3 rise 5
server 172.31.6.105 172.31 .6.105:9443 check inter 3s fall 3 rise 5
8.5.3.3 重启负载均衡
[root@ceph-client1-centos7 ~]# systemctl restart haproxy
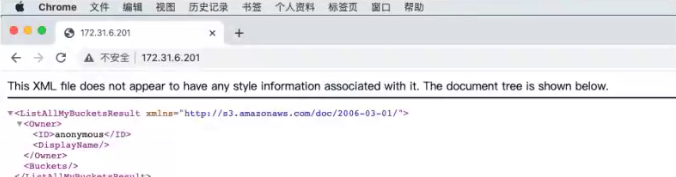
8.5.3.4 测试访问
8.5.4 日志及其它优化配置
#创建日志目录:
[root@ceph-mgr2 certs]# mkdir /var/log/radosgw
[root@ceph-mgr2 certs]# chown ceph.ceph /var/log/radosgw


#当前配置
[root@ceph-mgr2 ceph]# vim ceph.conf
[client.rgw.ceph-mgr2]
rgw_host = ceph-mgr2
rgw_frontends = "civetweb port=9900+8443s
ssl_certificate=/etc/ceph/certs/civetweb.pem
error_log_file=/var/log/radosgw/civetweb.error.log
access_log_file=/var/log/radosgw/civetweb.access.log
request_timeout_ms=30000  num_threads=200"
#请求超过30s 报超时    #100线程 每个显示处理一个请求(2000)

#https://docs.ceph.com/en/mimic/radosgw/config-ref/
num_threads默认值等于 rgw_thread_pool_size=100


#重启服务
[root@ceph-mgr2 certs]# systemctl restart ceph-radosgw@rgw.ceph-mgr2.service

#访问测试:
[root@ceph-mgr2 certs]# curl -k https://172.31.6.108:8443

#验证日志
tail /var/log/radosgw/civetweb/access.log
8.6 测试数据读写
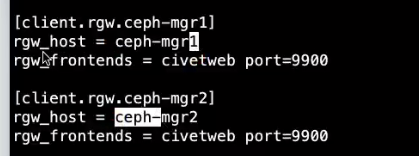
8.6.1 RGW Server配置:
在实际的生产环境,RGW1和RGW的配置参数是完全一样的.
jack@ceph-mgr2:-$ sudo cat /etc/ceph/ceph.conf
[global]
fsid = 1883278f-95fe-4f85-b027-3a6eba444861
public_network = 172.31.0.0/21
cluster_network = 192.168.0.0/21
mon_initial members = ceph-mon1
mon_host= 172.31.6.101
auth_cluster_required = cephx
auth_service_required = cephx
auth_client_required = cephx


[client.rgw.ceph-mgr1]
rgw_host = ceph-mgr1
rgw_frontends = civetweb port:=9900
rgw_dns_name = rgw.magedu.net

[client.rgw.ceph-mgr2]
rgw_host = ceph-mgr2
rgw_frontends = civetweb port:=9900
rgw_dns_name = rgw.magedu.net
8.6.2 创建RGW 账号
ceph@ceph-deploy:/home/ceph/ceph cluster$ rdosgw admin user create --uid="user1" --display-name="user1"

#创建用户会生成key 是访问SGW存储的凭证

"keys": [
    {
         "user" : ""use1"",
         "access_key": "T119RIWTRMMI9BBJEC66",
         "secret_key": "r8kwaYi9hdZJyCKW23hucEUABli 5xOAXSGs8worB"
}
],
8.6.3 安装s3cmd客户端
s3cmd 是一个通过命令行访问ceph RGW实现创建存储同桶、上传、下载以及管理数据到对象存储的命令行客户端工具。
ceph@ceph-deploy:/home/ceph/ceph-cluster$ sudo apt-cache madison s3cmd
ceph@ceph-deploy:/home/ceph/ceph-cluster$ sudo apt install s3cmd
8.6.4 配置客户端执行环境
8.6.4.1 s3cmd客户端添加域名解析
vim /etc/hosts
127.0.0.1   localhost
127.0.1.1  ubuntu.example.local  ubuntu

172.31.6.108 ceph-node3.example.local ceph-node3
172.31.6.109 ceph-node4.example.local ceph-node4
172.31.6.201 rgw.magedu.net
8.6.4.2 配置命令执行环境
jack@ceph-deploy:~$ sudo su - root
root@ceph-deploy:~# s3cmd --help
root@ceph-deploy:~# s3cmd --configure

Enter new values or accept defaults in brackets with Enter.
Refer to user manual for detailed description of all options.

Access key and Secret key are your identifiers for Amazon S3. Leave them empty for
using the env variables.

Access Key: JIJX25OFEJ40JEBECDZV #输入用户 access key
Secret Key: vBa23pj4AhGk9GPeSrhL9NLaldShudVfjQ4AC90E #输入用户secret key
Default Region [US]: #region 选项

Use "s3.amazonaws.com" for S3 Endpoint and not modify it to the target Amazon S3.
S3 Endpoint [s3.amazonaws.com]: rgw.magedu.net:9900 #RGW 域名
Use  "%(bucket)s.s3.amazonaws.com" to the target Amazon S3. "%(bucket)s" and "%(location)s" vars can be used
if the target S3 system supports dns based buckets.
DNS-style bucket+hostname:port template for accessing a bucket
[%(bucket)s.s3.amazonaws.com]: rgw.magedu.net:9900/%(bucket) #bucket城名格式
Encryption password is used to protect your files from reading
by unauthorized persons while in transfer to S3
Encryption password : #秘钥是否使用密码加密
Path to GPG program [/usr/bin/gpg]: #使用gpg进行加密(系统自带不需要安装)

#是否使用HTTPS
When using secure HTTPS protocol all communication with Amazon S3
servers is protected from 3rd party eavesdropping. This method is
slower than plain HTTP, and can only be proxied with Python 2.7 or newe r
Use HTTPS protocol [Yes]: No

##是否使用代理服务器
On some networks all internet access must go through a HTTP proxy.
Try setting it here if you can't connect to S3 directly
HTTP Proxy server name :

#生成的信息
New settings:
Access Key: T119RIWTRMMI9BBJEC66
Secret Key: r8kWaY i9hdZJyCKW23hucEUABli5x0AXSGs8worB
Default Region: US
S3 Endpoint: rgw.magedu.net:9900
DNS-style bucket+hostname:port template for accessing a bucket: rgw.magedu.net:9900/%(bucket)
Enc ryption password:
Path to GPG prog ram:/usr/bin/gpg
Use HTTPS protocol: False
HTTP Proxy server name:
HTTP Proxy server port: 0
Test access with supplied credentials? [Y/n]] Y #测试连接
PLease wait, attempting to list all buckets.. .
Success. Your access key and secret key worked fine :-) #如果连接成功就弹出保存配置
Now verifying that encryption works. . .
Not conf igured. Never mind.
Save settings? [y/N] y
Configuration saved to '/root/.s3cfg'

#测试命令
s3cmd la
8.6.5 命令行客户端s3cmd 验证数据上传
8.6.5.1 查看帮助��信息
s3cmd --help
8.6.5.2 创建bucket 以验证权限
存储空间(Bucket) 是用于存储对象(Object) 的容器, 在上传任意类型的Object前,您需要先创建Bucket.
Make bucket
s3cmd mb s3://BUCKET
-------------------------------------------------

root@ceph-deploy:~# s3cmd mb s3://mybucket
Bucket 's3://mybucket/' created

root@ceph-deploy:~# s3cmd mb s3://css
Bucket 's3://css/' created

root@ceph-deploy:~# s3cmd mb s3://images
Bucket 's3://images/' created
8.6.5.3 验证上传数据
 Put file into bucket
       s3cmd put FILE [FILE..] s3://BUCKET[/PREFIX]

root@ceph-deploy:~# wget http://www.magedu.com/wp-content/uploads/2019/07/2019070508503489.png
#上传数据


root@ceph-deploy:~# s3cmd put 2019070508503489.png s3://mages/
upload: '2019070508503489.png -> 's3://images/2019070508503489.png' [1 of 1] 40703 of 40703 100% in  0s  1911.84 kB/s done

root@ceph-deploy:~# s3cmd put 2019070508503489.png s3://images/png/
upload: '2019070508503489.png' -> 's3://images/png/2019070508503489.png' [1 of 1] 40703 of 40703 100% in 2s 16.24 kB/s done


#验证数据
root@ceph-deploy:~# s3cmd ls s3://images/
                      DIR s3://images/png/
2021-08-26 13:35    40703 s3://images/2019070508503489.png
root@ceph-deploy:~# s3cmd ls s3://images/png/
2021-08-26 13:35    40703 s3://images/png/2019070508503489.png
8.6.5.4 验证下载文件
Get file from bucket

    s3cmd get s3://BUCKET/OBJECT LOCAL_FILE
------------------------------------------------------------------------
root@ceph-deploy:~# s3cmd get s3://images/2019070508503489.png /opt/
download: 's3://images/2019070508503489.png' -> /opt/2019070508503489.png' [1of 1]
40703 of 40703 100% in  0s  5.80 MB/s done

root@ceph-deploy:~# ls /opt/2019070508503489.png
8.6.5.5 删除文件
Delete file from bucket (alias for del)
s3cmd rm s3://BUCKET/OBJECT
---------------------------------------------------
root@ceph-deploy: ~# s3cmd ls s3://images/ #验证当前文件
                      DIR s3://images/png/
2021-08-26 13:35  40703   s3://images/2019070508503489.png


root@ceph-deploy: ~# s3cmd rm s3://images/2019070508503489.png #删除文件
delete: 's3://images/2019070508503489.png'


root@ceph-deploy:~# s3cmd ls s3://images/ #验证是否被删除
                      DIR s3://images/png/
#查看存储池pg
ceph pg ls-by-pool default.rgw.buckets.data awk '{print $1, $2, $15}'